Raymii.org

אֶשָּׂא עֵינַי אֶל־הֶהָרִים מֵאַיִן יָבֹא עֶזְרִֽי׃Home | About | All pages | Cluster Status | RSS Feed
Spinrite 6.0 on UEFI and an NVMe SSD drive
Published: 03-11-2022 21:00 | Author: Remy van Elst | Text only version of this article
❗ This post is over four years old. It may no longer be up to date. Opinions may have changed.
Table of Contents
Spinrite is a hard drive recovery and maintenance utility written by Steve Gibson from Gibson Research Corporation. It is marketed on the Security Now TWiT podcast which I often listen to. I have bought a copy of it and sometimes use it on solid state disks or SD cards. Spinrite 6.0 is written is assembly language and runs on top of MS-DOS or FreeDOS, using the BIOS. UEFI is not supported and neither are NVMe drives. This post will show you how to run Spinrite 6.0 on such a system anyway, using a modern linux live USB drive that can boot on UEFI only system and VirtualBox, exposing the NVMe disk as a SATA drive.
This post is neither sponsored nor endorsed by GRC, just some random person online figuring stuff out. Continue on with caution, you might inadvertently loose important data. Make sure you have a working (and regularly tested) backup.
Some people claim it is snake oil, or that badblocks or ddrescue are better
or that a failing drive shouldn't be stressed more, In my humble opinion
Spinrite is useful in some cases and I have had it make drives usable again
that were failing.
Once I helped a family member who had no backup of a brand new, 4 week old laptop which would often blue-screen after a few minutes while being extremely slow. Further troubleshooting revealed that the blue screens were related to disk issues. Running Spinrite on level 2(read everything and allow the drive controller to mark sectors as bad, hopefully relocating the data) made all those problems to away. That laptop's drive continued to work for nearly 5 years until the laptop was replaced, even though I advised them to replace the drive right away under warranty. I did of course set them up with a backup.
I also often use Spinrite to "fix" cheap SD cards that fail in Raspberry Pi's or other SBC's. Often that works, sometimes the card is too far gone.
The best use of Spinrite is making sure you don't need it. Have a backup system in place and test it regularly, including off-site and offline backups.
But if you do want to run it, you might run into issues with modern hardware.
Spinrite 6.0 on a UEFI only system
If you have a system that can boot via the BIOS (legacy boot) and set the SATA
controller to AHCI, that is your best bet, it will probably run Spinrite just
fine. My most recent work machine however is a UEFI only system with no
option to set the disk mode to AHCI. It has a legacy boot option, but that
fails to boot Spinrite via FreeDOS (erroring out with Invalid Opcode at 000x
yyzz...). Making an actual MS-DOS live disk does let it boot up, but when it is
enumerating the drives, it reboots the machine. The drives are two NVMe SSD disks.
The process I used to run Spinrite was to boot up a Debian linux derivative (Antix 22) that supports UEFI only systems and install VirtualBox in that live environment. VirtualBox can pass through actual drives as other storage types (a SATA drive as IDE for example), which Spinrite then can scan.
You will need 2 USB drives. One to boot from and one to put the Spinrite ISO on.
Creating the Live USB drive
I choose Antix because that is a small ISO and I only had a 4 GB USB drive at that moment. I also run Antix on a few older machines here, it works quick and snappy. Any Debian derivative probably works. Download the 64 bit version since VirtualBox does not have a modern 32 bit version in the repositories.
Use Rufus to write that linux ISO to your USB drive, make sure to give it some persistent storage space.
On the Windows machine where you ran Rufus, open up your copy of Spinrite and save an ISO file:
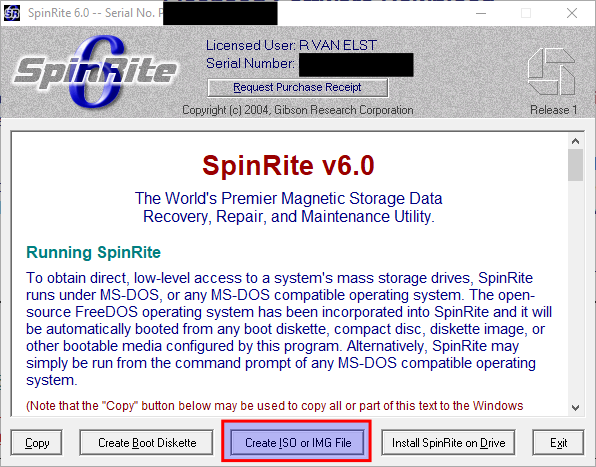
Put that ISO file on the other USB drive and boot your machine from the Linux Live USB drive.
Installing and configuring VirtualBox
Once booted up, fire up a terminal and install VirtualBox using the following command:
sudo apt install virtualbox-*
In my case, both a DKMS (kernel driver) and a UI (virtualbox-qt) were
installed and a reboot was not required.
Fire up VirtualBox via the terminal, using sudo to launch it as root. This
is needed for the raw disk access:
sudo virtualbox
Create a new Virtual machine and follow the wizard. Select DOS as the operating system. Create a new virtual disk of 2 GB and add the Sprite ISO to the VM. After the wizard finishes, open the settings and make sure only the ISO image is selected as boot option.
Fire up the VM to test that Spinrite boots and sees your small 2 GB disk. Turn the VM off.
Continue on exposing your actual NVMe disk as an image file to VirtualBox.
Adding the raw disk
To pass through the NVMe drive, you must use the following command to create a special disk file VirtualBox can use:
sudo VBoxManage internalcommands createrawvmdk -filename
nvme0.vmdk -rawdisk /dev/nmve0n1
The VirtualBox manual has a big red warning:
Raw hard disk access is for expert users only. Incorrect use or use of an outdated configuration can lead to total loss of data on the physical disk. Most importantly, do not attempt to boot the partition with the currently running host operating system in a guest. This will lead to severe data corruption.
Since we're booted from a Live USB drive, the only thing you need to double check is the boot devices in VirtualBox, make sure not to select the disk there, only the ISO file containing Spinrite.
The commands in the manual differ from the commands above, the newer versions use this command syntax:
VBoxManage createmedium disk --filename
nvme0.vmdk --format=VMDK --variant RawDisk --property
RawDrive=/dev/nvme0n1
The version of VirtualBox in the Debian repository is older which is why I used the old syntax.
In the Virtual machine settings, to to Storage and use the green PLUS button at the bottom to add a SATA controller (or IDE). Select that controller and click the green PLUS button on the disk symbol (on that line, next to the optical disk image):

Use the media manager to select the NVMe disk file you just created. I have two NVMe disks in this machine, but added just one at a time to run Spinrite. This is how my VirtualBox storage settings look:
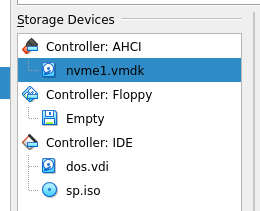
Make sure that the raw disk image is not selected in the boot options.
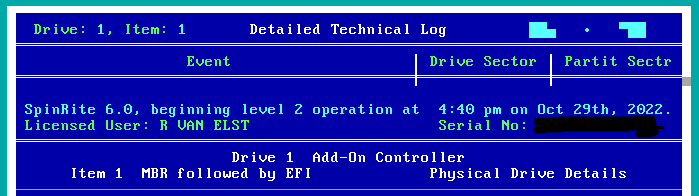
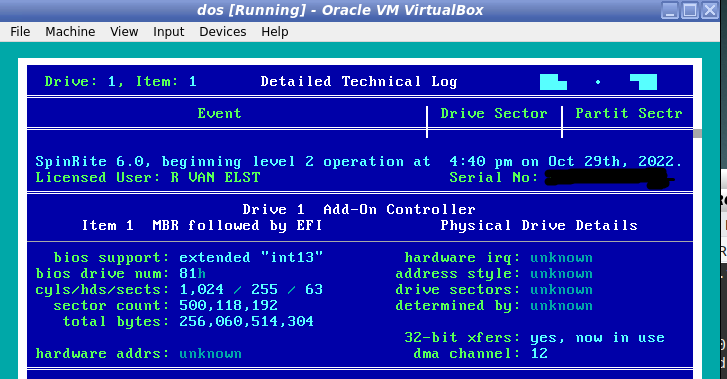
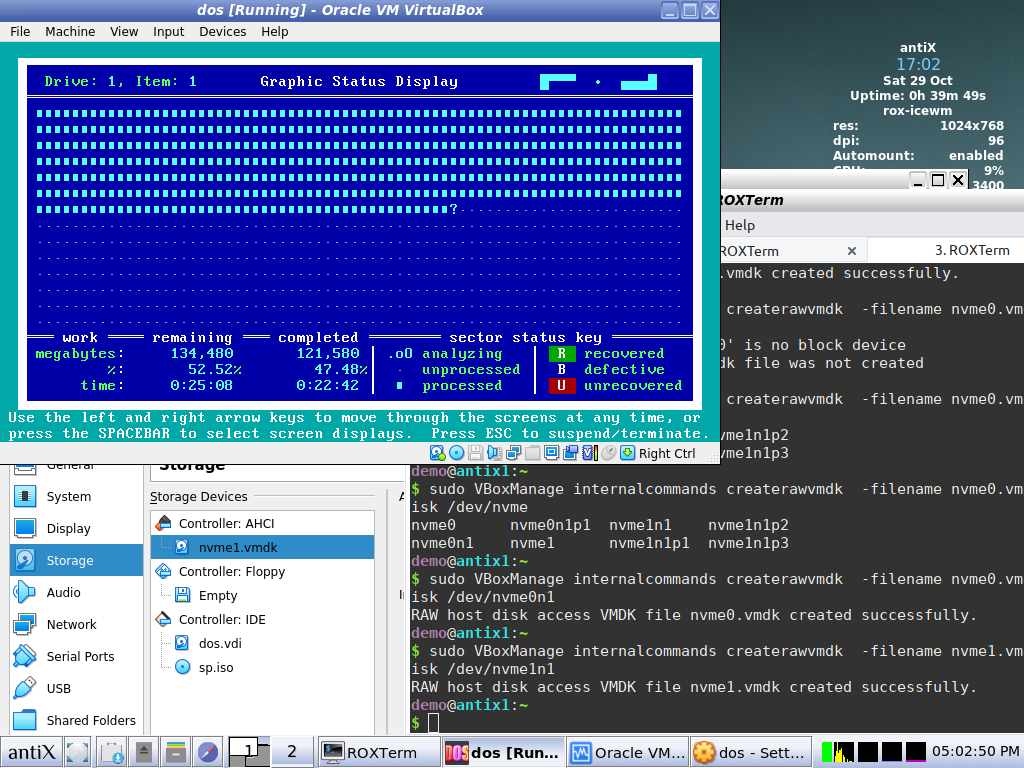
Fire up the virtual machine again, let Spinrite boot up and if all went well, you should now be able to select your NVMe disk. Below is a screenshot of Spinrite running in VirtualBox on an 256 GB NVMe SSD drive, on a machine without a classic BIOS or legacy boot option:
This is the output of my regular Linux installation, nvme list, showing the 2 drives:
$ sudo nvme list
Node                  Generic               SN                   Model                                    Namespace Usage                      Format           FW Rev
--------------------- --------------------- -------------------- ---------------------------------------- --------- -------------------------- ---------------- --------
/dev/nvme1n1          /dev/ng1n1            6[..........]S         KXG50ZNV256G TOSHIBA                     1         256.06  GB / 256.06  GB    512   B +  0 B   AAHA4102
/dev/nvme0n1          /dev/ng0n1            S[...........]B      Samsung SSD 970 EVO 1TB                  1         796.93  GB /   1.00  TB    512   B +  0 B   2B2QEXE7
The entire Antix Linux live environment (running at a reduced resolution due to the machine also having an NVidia graphics card) looks like this:
After Spinrite finished, I shut down the machine and rebooted into the regular
linux running on it. That has an encrypted disk, using dm-crypt and lvm, but
with trim enabled and the recent cloudflare additions to linux disk
encryption to speed things up. Full disk encryption is rather slow
without that and over time, not running trim reduces the speed even more,
especially when the disk gets full. Running Spinrite also helps with
(my perceived feeling of) increasing the snappiness of the machine.
Do note that I'm not sure if this is a supported way of running Spinrite and that it might delete all your data. I have not had data loss or issues with exposing my raw NVMe disk as an IDE or SATA disk via VirtualBox, but I might have just been lucky.
Spinrite 6.1 is on the way, which will be faster because it doesn't use the BIOS for disk access anymore. It will also support disks larger than 2 TB, but UEFI or NVMe support are not included. Those are planned for later versions.
Before going the VirtualBox route, I tried to use KVM via virt-manager but
that failed to pass through the NVMe drive. First it errored on the cache
mode, but none of the methods worked (writeback, etc), then after messing
around I received a few more errors. VirtualBox worked instantly without
issues, but I did try kvm first because I thought that virtualbox required a
reboot after installing, which wasn't the case after all.